# Export your data models and segments to FTP

### Overview

This destination service allows DinMo to insert new files or update existing ones in an FTP server, based on your DinMo models or segments.

To use this service, follow these three steps:

1. **Create an FTP destination**. Follow our [step-by-step guide](/integrations/destination-platforms/ftp.md) to establish this connection.
2. **Create your DinMo model or segment** representing the data you want to send to your FTP server.
3. **Activate your model or segment** with the FTP destination to start synchronization.

Every time the activation runs:

* If the file does not yet exist: DinMo will create it with all the rows in the query results
* If the file already exists: DinMo will overwrite it, with only the lines added since the last sync

If you don't want to overwrite existing files, we recommend using the timestamp in your file names.

### Activation Setup

Once the FTP destination is configured, create an activation to begin syncing your data. To do so, go to the *Activations* tab and click on "New activation". You will be asked to choose the model or segment you want to send to your FTP server and select your FTP destination you've just created

Then, you can configure your activation:

* **Indicate the folder where you wish to store your file**. By default, the file will be sent to the login directory of the FTP server.

{% hint style="info" %}
Learn more about absolute or relative path [here](#troubleshootings)
{% endhint %}

{% hint style="warning" %}
The user needs to have access to the target directory and file with **write privileges**. A `permission denied` error message during a sync indicates the user may not have write permissions for both the directory or the file.
{% endhint %}

* **Indicate the name you wish to give to your file.**

If you don't want to override existing files, we recommend including timestamp variables in the filename. To do so, you just need to surround each variable with `{}`. DinMo supports these timestamp variables:

* **`{YYYY}`**: Full year (e.g., 2025)
* **`{YY}`**: Last two digits of the year (e.g., 25)
* **`{MM}`**: Month (01-12)
* **`{DD}`**: Day of the month (01-31)
* **`{HH}`**: Hour (00-23)
* **`{mm}`**: Minute (00-59)
* **`{ss}`**: Second (00-59)
* **`{ms}`**: Millisecond (000-999)
* **`{X}`**: Unix timestamp in seconds
* **`{x}`**: Unix timestamp in milliseconds

For example: `{YY}-{MM}-{DD}_export` will be `25-04-14_export.csv` for the upload of April 14th 2025.

* **Select file format**. DinMo supports CSV, JSON (and new delimited JSON), XML and Apache Parquet.
  * For the CSV option, you'll be asked to choose the CSV delimiter and if you want to include the CSV headers.
* **Indicate the type of run you would like to do**, based on the result you would like to see in your file.

{% hint style="info" %}
Check [this section](#run-types-and-sync-modes) if you want to learn more about the Run Types and the Sync Modes
{% endhint %}

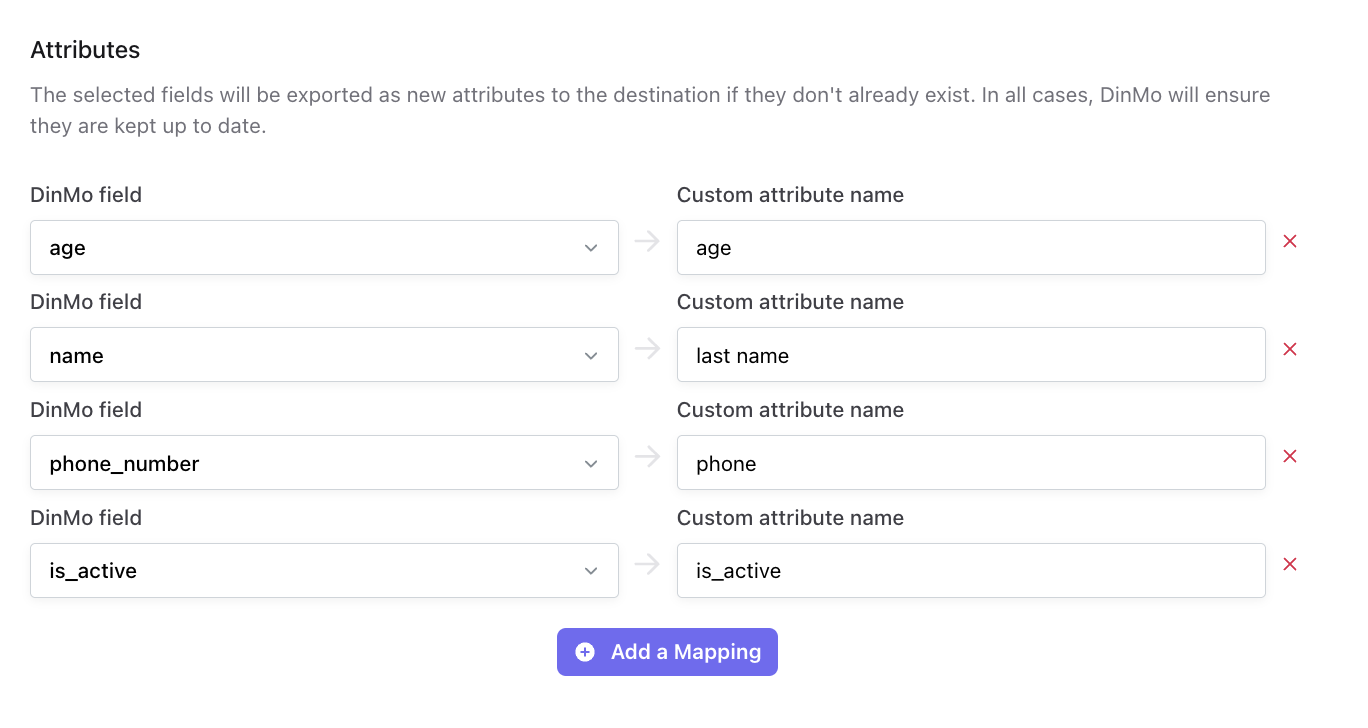
* **Map all the DinMo attributes** that you want to include in your file. You can of course rename any column you're syncing by choosing your *"custom attribute name"*.

<figure><img src="/files/5mZfN6bePUKSttFu18Pk" alt=""><figcaption></figcaption></figure>

The example above shows how to export the `age`, `name`, `phone_number` and boolean `is_active`. These columns are mapped to new fields in the destination file as `age`, `last name`, `phone` and `is_active`. DinMo exports these fields to the new fields in the file and ignores all other columns from your model or segment.

#### Run Types and Sync Modes

When configuring your sync, you will be asked to choose the Run Type and the Sync Mode.

For FTP activations, here are the available options:

<table data-full-width="true"><thead><tr><th>Run Type</th><th>Description</th><th>Use Case</th><th>Behavior</th></tr></thead><tbody><tr><td><strong>FULL ONLY</strong></td><td>Every sync processes <em>all</em> records from the source and exports a complete file <em>(or several, if size limit is reached).</em></td><td>When the exported file must always contain a full extract, and incremental updates are not required.</td><td><ul><li>No delta logic</li><li>Every sync rebuilds the full export</li><li>Recommended for Snapshot mode</li></ul></td></tr><tr><td><strong>FULL THEN DELTA</strong></td><td>The first sync exports all records. All following syncs export only changed records, based on DinMo’s delta detection logic.</td><td>When exporting large datasets frequently and wanting to reduce file size or processing time.</td><td><ul><li>Sync 1 → Full export</li><li>Next syncs → Only changed records (new, updated).</li><li>Compatible with INSERT, UPSERT, and DIFFERENCE modes</li></ul></td></tr></tbody></table>

Sync modes determine how data is synchronized between your data source and destination. They control whether to insert new records, update existing ones, or both, and how to handle the synchronization process.

For the FTP destination, here are the available options:

<table data-full-width="true"><thead><tr><th>Sync Mode</th><th>Description</th><th>Use Case</th><th>Behavior</th></tr></thead><tbody><tr><td><strong>SNAPSHOT</strong></td><td>Exports a complete snapshot of all records at the time of sync. Each sync can generate a new file with a timestamped name.</td><td>Useful for backups or systems expecting full “point-in-time” extracts.</td><td><ul><li>Always exports the full segment / model</li><li>Creates a new file with timestamp</li><li>No incremental logic</li></ul></td></tr><tr><td><strong>UPSERT</strong></td><td>Writes all updated or new records into the exported file.</td><td>Keeps FTP files up-to-date with the latest source data.</td><td><ul><li>New records → included in the exported file</li><li>Existing records → included <strong>if, and only if</strong>, there are updated values</li><li>Deleted records → simply not present in the file</li></ul></td></tr><tr><td><strong>INSERT</strong></td><td>Adds only new records to the exported file. Existing records are never modified.</td><td>Useful for append-only files, such as historical logs or event tracking.</td><td><ul><li>New records → added to file</li><li>Existing records → ignored</li><li>Missing records → no action</li></ul></td></tr><tr><td><strong>DIFFERENCE</strong></td><td>Generates separate files for added, updated, and removed records between syncs.</td><td>For audit trails, incremental processing, or systems needing change-specific files.</td><td><ul><li>Creates <code>_added.csv</code>, <code>_updated.csv</code>, <code>_removed.csv</code><br><br><em>(or other extensions)</em></li><li>Each file contains only the relevant change type</li></ul></td></tr></tbody></table>

#### Scheduling

Define how frequently your data is sent to your FTP server.

Each scheduled operation performs a delta operation, inserting the rows that were added since the last sync. This helps optimize **bandwidth and storage costs** while keeping your exports fresh and relevant.

### Troubleshootings

* **How do I know where to send my file?**

You can either input an absolute path (starting with `/`) or a relative one. Relative paths start from the login directory of the user connected. To target directly this directory, input `.`

For example, consider the following directory:

```
/
├── foo
├── home
│   └── alex
│       └── baz
```

We are logged as user `alex`.

* To target the `foo` folder, use an absolute path: `/foo`.
* To target the `baz` folder, an absolute path is: `/home/alex/baz`.

You can also use a relative path. Relative paths start from the login directory of the `alex` user, and do not start with `/`. If the login directory is the `alex` folder, just input `baz`.

{% hint style="warning" %}
Keep in mind that relative notation depends on the user logged in, so if you change the FTP user used in the platform, the files may end up in a different location on the server.
{% endhint %}

To target directly the login directory in relative notation, you can input `.`, which means "here" in Unix pathing. To go back to the upper folder, use `..`

```
folder            absolute path               relative path
─────────────────────────────────────────────────────────────────
/                 /                           ../..
├── foo           /foo                        ../foo
├── home          /home                       ..
│   └── alex      /home/alex                  .
│       └── baz   /home/alex/baz              baz
```


---

# Agent Instructions: Querying This Documentation

If you need additional information that is not directly available in this page, you can query the documentation dynamically by asking a question.

Perform an HTTP GET request on the current page URL with the `ask` query parameter:

```
GET https://docs.dinmo.io/integrations/destination-platforms/ftp/export-your-data-models-and-segments.md?ask=<question>
```

The question should be specific, self-contained, and written in natural language.
The response will contain a direct answer to the question and relevant excerpts and sources from the documentation.

Use this mechanism when the answer is not explicitly present in the current page, you need clarification or additional context, or you want to retrieve related documentation sections.